How to Build a Client Portal with Automation
How to build an automated client portal for project status, documents, and invoices using Notion or Airtable as backend with n8n automation. Setup in a weekend for $0-50/month.
How to Build a Client Portal with Automation
You can build a fully automated client portal using Notion or Airtable as the backend, n8n for automation, and WhatsApp or email for notifications. Total cost: $0 to $50 per month. Setup time: one weekend.
Dedicated client portal software like Copilot, SuiteDash, or Moxo runs $29 to $99 per month per user. For a solo operator or small agency with 5 to 20 clients, that is money you don’t need to spend.
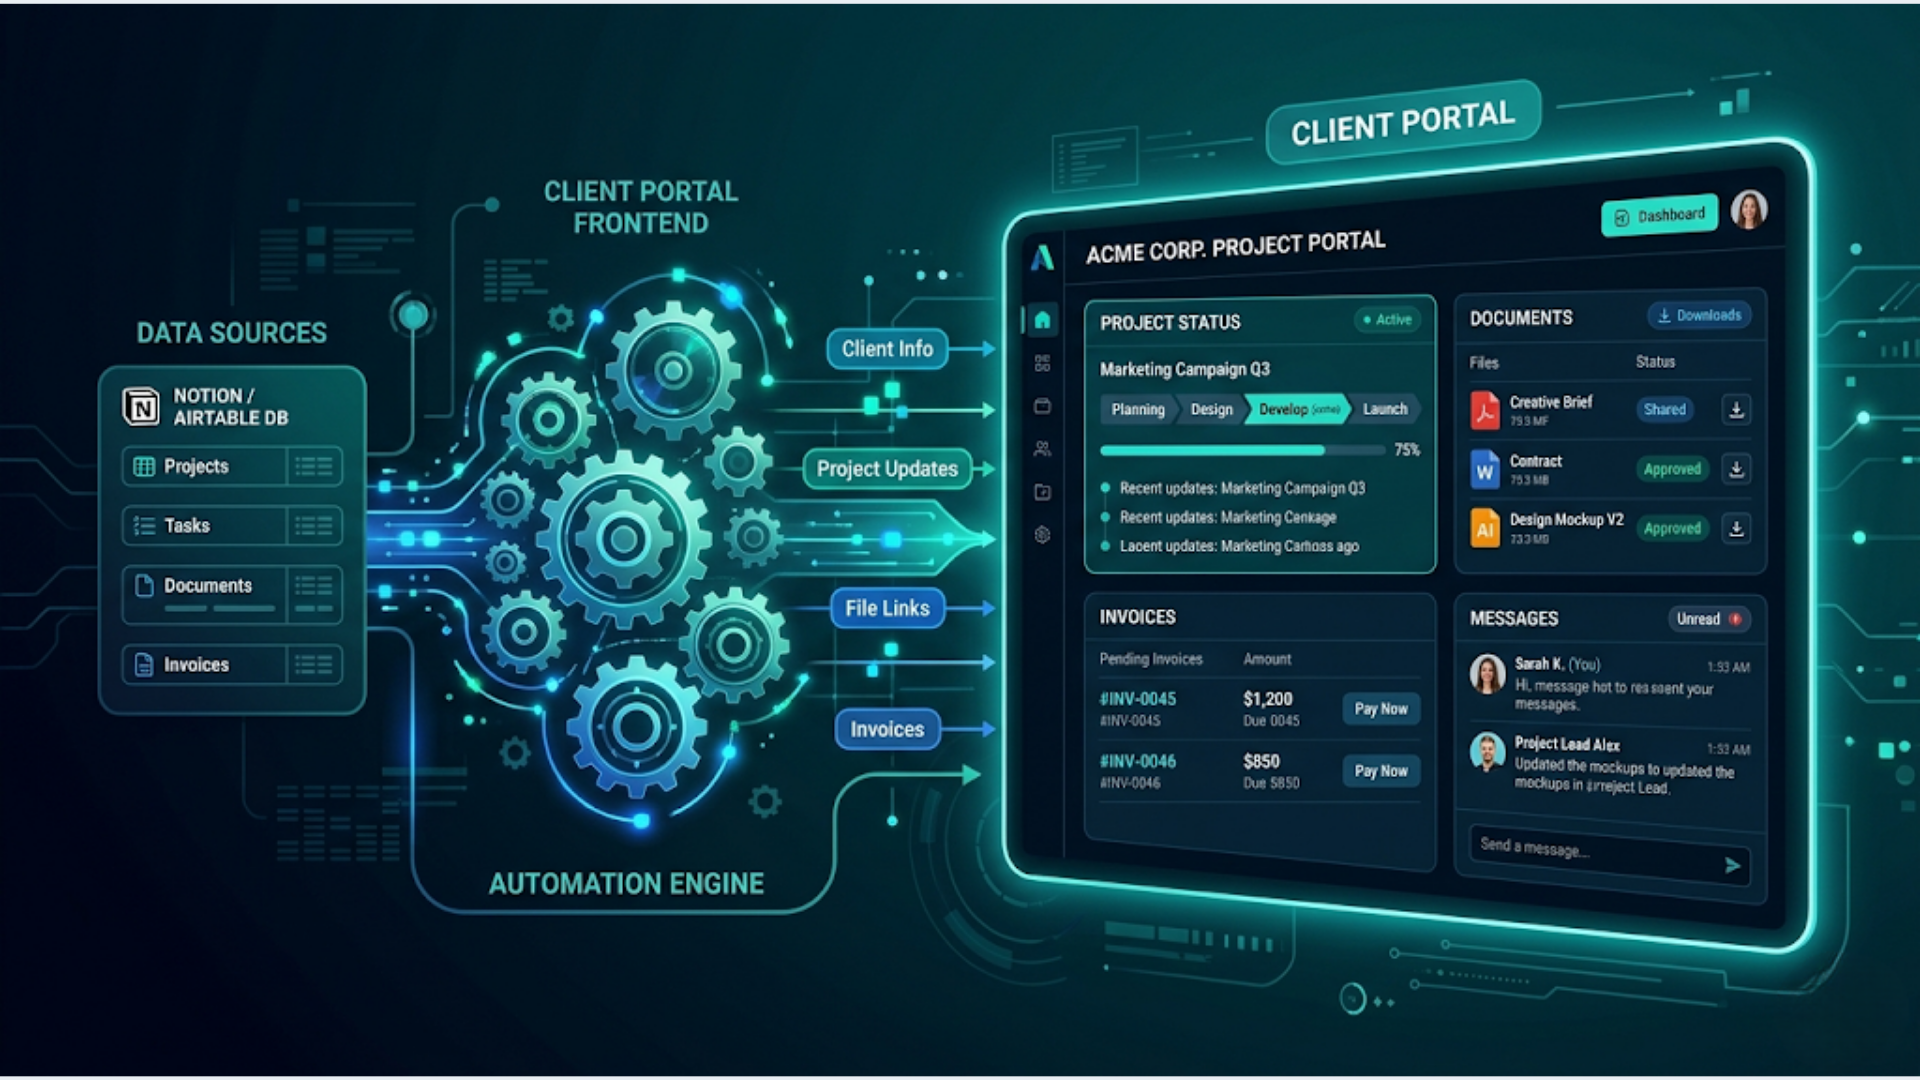
I build these systems. The stack I’m going to walk through handles project status updates, document sharing, invoice tracking, and client notifications. Your clients get a clean, branded view. You get automatic updates without manual copy-pasting between tools.
Here is exactly how to set it up.
Why Most Client Portals Fail (And What Actually Works)
Most agencies try one of two things. They buy expensive portal software they barely use. Or they share a Google Drive folder and call it a portal.
Both fail for the same reason. The portal only works if it stays updated. And nobody wants to manually update a dashboard after every task, deliverable, or invoice.
The fix is simple. Use a database tool you already know (Notion or Airtable) as the source of truth. Then automate every update, notification, and status change through n8n workflows.
Your clients see a live, always-current portal. You do zero extra work because the automation handles the updates.
What a good client portal needs:
- Project status board. Current phase, next milestone, completion percentage. Updated automatically when tasks move in your project management tool.
- Document hub. Proposals, contracts, deliverables, briefs. Organized by project. Clients upload files here too.
- Invoice tracker. Outstanding invoices, payment status, receipt history. Auto-synced from your billing tool.
- Activity feed. Recent updates, messages, approvals needed. Clients know what happened without emailing you.
- Notification system. WhatsApp or email alerts when something needs their attention.
That is the whole scope. No feature bloat. No unused chat widgets.
Choosing Your Backend: Notion vs Airtable
Both work. The choice depends on what you already use and how many clients you serve.
| Feature | Notion | Airtable |
|---|---|---|
| Cost | Free (up to 10 guests) or $10/month (unlimited) | Free (up to 5 editors) or $20/month/user |
| Client view | Shared page with restricted permissions | Shared view or Airtable Interface |
| Look and feel | Clean, document-style, customizable | Structured, spreadsheet-style, Interface Designer |
| API | Full REST API, good for automation | Excellent REST API, better for structured data |
| File storage | Unlimited on paid plans | 20GB on Pro plan |
| Best for | Fewer than 15 clients, document-heavy work | 15+ clients, structured data, multiple project types |
In India specifically, Notion has an edge because its free tier allows 10 guest collaborators. For a solo freelancer or small agency, that means 10 clients with portal access at zero cost. Airtable’s free tier limits you to 5 editors and 1,000 records.
My recommendation: Start with Notion if you have fewer than 15 clients and your deliverables are document-heavy (reports, strategies, content). Switch to Airtable when you need structured tracking across many projects with different schemas.
For this guide, I will cover both setups.
Setting Up the Notion Client Portal
Here is the step-by-step.
Step 1: Create the master database.
Build a single Notion database called “Client Projects” with these properties:
- Client Name (Select)
- Project Name (Title)
- Status (Select: Not Started, In Progress, Review, Complete)
- Phase (Select: Discovery, Build, Testing, Delivery)
- Progress (Number, 0 to 100)
- Start Date (Date)
- Deadline (Date)
- Deliverables (Files & Media)
- Invoice Status (Select: Pending, Sent, Paid, Overdue)
- Invoice Amount (Number)
- Last Updated (Date, auto-filled by automation)
Step 2: Create filtered views per client.
For each client, create a filtered view that shows only their projects. This is what they see. They cannot access other clients’ data.
In Notion, share that specific filtered view with the client’s email. They get read-only access to their own projects.
Step 3: Build the client page template.
Create a template page for each client that includes:
- A linked view of their projects (filtered)
- A section for shared documents (embedded files or linked database of documents)
- An activity log (a simple toggle list you append to)
- Contact info and escalation process
This page becomes their portal. One URL. Bookmark it. Done.
Step 4: Connect n8n for automatic updates.
This is where the magic happens. Set up n8n workflows to:
- Update project status when a task completes in your project management tool (Trello, Asana, ClickUp, or even a Google Sheet). n8n watches for status changes and pushes the update to Notion via the Notion API node.
- Attach deliverables when you upload a file to a specific Google Drive or Dropbox folder. n8n detects the new file and links it to the correct Notion project record.
- Sync invoice status from Razorpay, Stripe, Zoho Invoice, or your billing tool. When a payment is received, n8n updates the Invoice Status property in Notion from “Sent” to “Paid.”
- Append to the activity log whenever any of these automations run. The client sees “Deliverable uploaded: Q2 Report” or “Invoice #1042 marked as Paid” in their activity feed.
Total n8n workflows needed: 3 to 5 depending on your tool stack.
Setting Up the Airtable Client Portal
Airtable works better for structured, multi-project tracking. Here is the setup.
Step 1: Build the base.
Create an Airtable base with these tables:
- Clients (Name, Email, Phone, Company, Portal Link)
- Projects (Project Name, Client link, Status, Phase, Progress, Start Date, Deadline)
- Deliverables (File, Project link, Upload Date, Type, Notes)
- Invoices (Amount, Status, Due Date, Client link, Project link, Payment Link)
- Activity Log (Timestamp, Client link, Action, Details)
Link the tables with relationship fields. Every record traces back to a client.
Step 2: Create Airtable Interfaces.
Airtable Interface Designer lets you build clean, app-like views. Create one interface per client that shows:
- Their projects in a Kanban or list layout
- Deliverables as a gallery
- Invoices as a summary with status badges
- Activity log as a timeline
Share the interface with the client via a restricted link. They see only their data.
Step 3: Automate with n8n.
The n8n workflow logic is identical to the Notion setup. The only difference is the output node. Use Airtable API nodes instead of Notion nodes.
One advantage of Airtable: it has built-in automations. For simple triggers (like sending an email when invoice status changes), you can use Airtable’s native automation and skip n8n for that specific workflow.
Step 4: Add the WhatsApp notification layer.
This is what separates a good portal from a great one. Clients don’t check portals daily. But they read WhatsApp messages within minutes.
Set up an n8n workflow that sends a WhatsApp message (via WATI, Twilio, or the WhatsApp Business API) whenever:
- A deliverable is uploaded
- A project moves to a new phase
- An invoice is generated or overdue
- Approval is needed on something
In India, WhatsApp is the default communication channel. A portal without WhatsApp notifications is a portal nobody checks.
The n8n Automation Layer (Detailed Workflows)
Let me break down the specific workflows you need.
Workflow 1: Project Status Sync
Trigger: Webhook from your project management tool (or a scheduled poll every 15 minutes). Logic: Compare current status in PM tool vs. Notion/Airtable. If different, update the portal database. Output: Update record + append activity log entry.
Cost: Free. n8n self-hosted handles this with zero per-execution cost.
Workflow 2: Deliverable Auto-Attach
Trigger: New file detected in a specific Google Drive folder (organized as /ClientName/ProjectName/). Logic: Extract client name and project name from the folder path. Find the matching record. Attach the file URL. Output: Update deliverable table + send WhatsApp notification to client.
Workflow 3: Invoice Status Sync
Trigger: Webhook from Razorpay, Stripe, or Zoho Invoice on payment received. Logic: Match the invoice to the client. Update status from Pending/Sent to Paid. Calculate if any invoices are overdue (current date > due date + 7 days). Output: Update invoice record + send receipt confirmation via WhatsApp + flag overdue invoices.
Workflow 4: Weekly Summary
Trigger: Cron schedule, every Monday at 9 AM. Logic: For each active client, compile: projects in progress, deliverables uploaded last week, invoices pending. Output: Send a formatted WhatsApp message or email summary to each client.
This weekly summary alone eliminates 80% of “hey, what’s the status?” messages from clients.
Workflow 5: Client Notification Router
Trigger: New entry in the Activity Log table. Logic: Check notification preferences (WhatsApp, email, or both). Route the message accordingly. Output: WhatsApp via WATI/Twilio + email via Gmail/SMTP node.
Cost Breakdown
Here is what this entire setup costs per month.
| Component | Free Tier | Paid Tier |
|---|---|---|
| Notion | $0 (up to 10 client guests) | $10/month (unlimited guests) |
| Airtable | $0 (limited records) | $20/month/seat |
| n8n (self-hosted) | $0 (unlimited workflows) | $0 |
| n8n (cloud) | $0 (limited) | $24/month (starter) |
| WhatsApp Business API | $0 (first 1,000 conversations/month in India) | ~$0.004 per conversation after that |
| Google Drive | $0 (15GB) | $2/month (100GB) |
| VPS for n8n | — | $5-12/month (Hetzner, DigitalOcean) |
Minimum viable cost: $0/month. Notion free tier + n8n self-hosted on a VPS you already have + WhatsApp free tier.
Comfortable production cost: $15-30/month. Notion paid + VPS for n8n + WhatsApp within free limits.
Compare that to dedicated portal software at $49 to $199 per month. You save $400 to $2,000 per year and own the entire system.
Common Mistakes to Avoid
Mistake 1: Over-engineering the portal. You don’t need a custom-coded React app. You don’t need user authentication flows. Notion or Airtable shared views with filtered permissions handle this perfectly for sub-50 client operations.
Mistake 2: Forgetting mobile. Both Notion and Airtable have native mobile apps. Your clients will check the portal on their phone. Test the mobile experience before you share the link.
Mistake 3: No notification layer. A portal without notifications is a portal nobody visits. The WhatsApp integration is not optional. It is the thing that makes the portal useful.
Mistake 4: Manual updates. If you are manually updating the portal, you will stop within two weeks. Every update must be automated. That is the entire point.
Mistake 5: Sharing the wrong view. Double-check that each client’s view is filtered correctly. One client seeing another client’s data is a trust-destroying mistake. Test with a second email address before going live.
FAQ
How long does it take to set up this client portal?
Plan for one weekend. Day one: build the database structure and client views. Day two: set up the n8n workflows and test them. If you are already familiar with Notion/Airtable and n8n, you can do it in 4 to 6 hours.
Can clients edit anything in the portal?
In Notion, you can grant “Can edit” permissions on specific databases. Useful for approval workflows or client feedback. In Airtable, Interface Designer allows you to create forms and editable fields for specific inputs. Keep edit permissions minimal. Clients should mostly read and approve.
What if I have more than 50 clients?
At 50+ clients, the shared-view approach starts to get unwieldy. At that scale, consider building a lightweight custom frontend using Airtable as the API backend and a simple Next.js or Retool app as the client-facing layer. But honestly, if you have 50+ active clients, you can afford $99/month portal software.
How do I handle file security?
Notion and Airtable both use signed URLs for file access. Files are not publicly accessible. For additional security, use Google Drive links with specific sharing permissions instead of uploading directly to Notion/Airtable. This gives you granular access control per file.
Does this work for clients who aren’t tech-savvy?
Yes. That is the whole point of using Notion or Airtable instead of building something custom. The interface is clean and simple. Clients click a link, see their projects, download files. No login required if you use Notion’s guest sharing. WhatsApp notifications mean they don’t even need to remember to check the portal.
What about white-labeling or custom branding?
Notion allows custom covers, icons, and formatting. You can make it look branded. Airtable Interfaces support custom themes. Neither is truly white-labeled (the Notion or Airtable logo appears). If white-labeling matters, look at Softr or Stacker as a frontend layer on top of Airtable. Adds $49/month but gives you a fully branded portal.
Can I migrate to proper portal software later?
Absolutely. Your data lives in structured databases. Exporting from Notion or Airtable to CSV and importing into SuiteDash, Copilot, or any other portal tool is straightforward. You are not locked in. Start cheap, upgrade when revenue justifies it.
Building client portals is one of the automation systems I set up for agencies and professional services firms. If your client communication is scattered across email, WhatsApp groups, and shared folders, a structured portal with automation cuts the chaos dramatically. See how triggerAll can build this for your team.
Need help implementing this?
Book a free 30-minute discovery call. We'll map your current setup, identify quick wins, and outline what automation can do for your business.
Book a Free Discovery Call