How to Automate Customer Onboarding Emails with n8n
Build a complete customer onboarding email sequence with n8n. Day 0 through Day 14 drip, conditional branching, CRM integration, A/B testing. Open rate benchmarks and step-by-step setup.
How to Automate Customer Onboarding Emails with n8n
Most onboarding email sequences are a joke. Five generic emails scheduled at fixed intervals, zero awareness of what the customer actually did. Open rates start at 60% for the welcome email and crater to 15% by message four.
I build these systems for clients. The ones that work are not linear drip campaigns. They are conditional sequences that adapt based on user behavior. n8n makes this possible without paying $300/month for HubSpot Marketing Hub or ActiveCampaign.
This guide walks through building a complete onboarding sequence: Day 0 through Day 14, conditional branching based on user actions, CRM tracking, and A/B testing subject lines. Total cost if you self-host n8n: roughly zero beyond your server and email sending costs.
Why Most Onboarding Sequences Fail
The standard playbook looks like this: welcome email on Day 0, feature introduction on Day 1, tips on Day 3, case study on Day 7, upsell on Day 14. Every customer gets the same emails at the same time regardless of behavior.
This ignores reality.
A customer who logged in three times on Day 1 and completed setup does not need a “getting started” email on Day 3. A customer who never opened the welcome email definitely does not need a feature deep-dive on Day 7. They need a re-engagement nudge.
The fix is conditional branching. Check what the customer did before sending the next email. This is table stakes for enterprise marketing tools but surprisingly hard to set up in most platforms without upgrading to expensive tiers.
n8n handles this natively with IF nodes, Switch nodes, and Wait nodes. No per-contact pricing. No feature gates. You build the logic you want.
Benchmarks worth knowing: onboarding emails with behavioral triggers see 2-3x the click-through rates of time-based sequences. For SaaS products specifically, companies with good onboarding sequences reduce churn by 25-40% in the first 90 days. That is not a vanity metric. That is revenue.
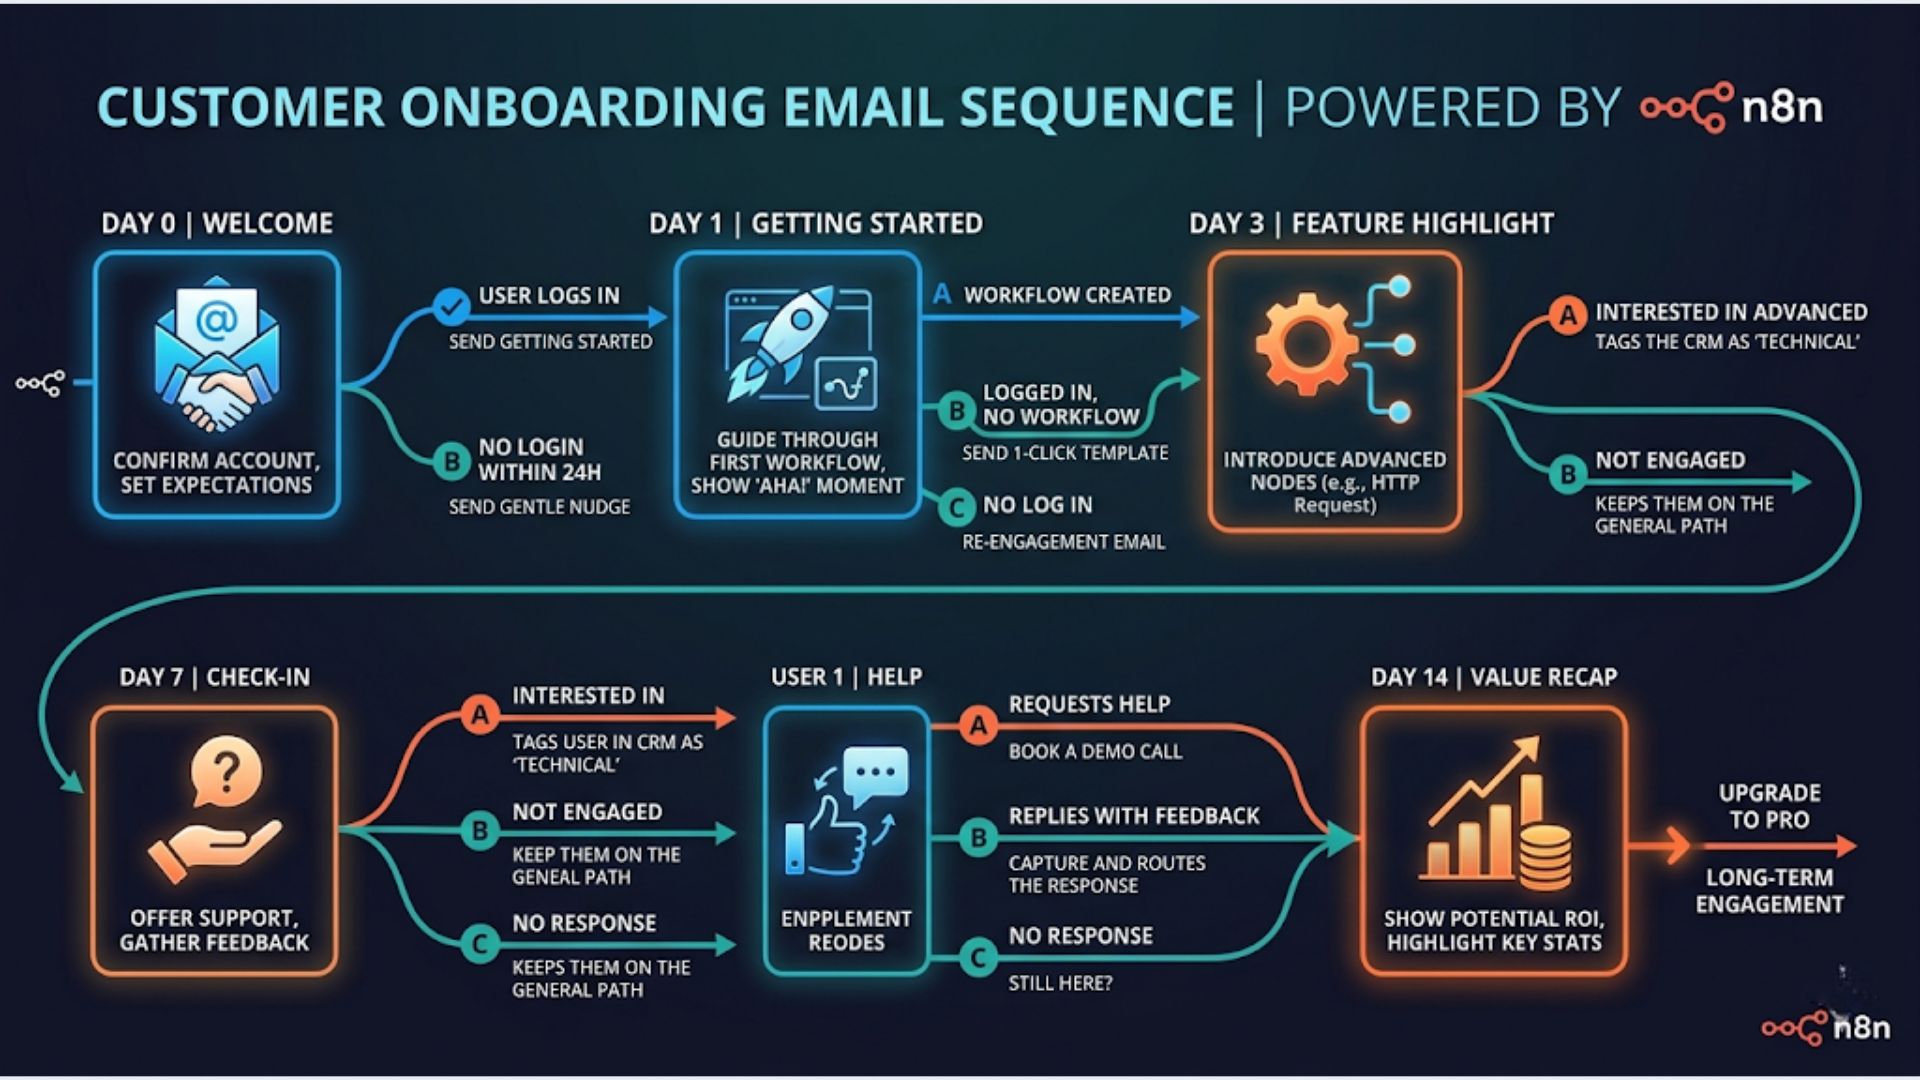
The Architecture: Signup to Day 14
Here is the complete onboarding flow:
Day 0 (immediate): Welcome email. Account confirmation. One clear CTA to complete first action.
Day 1 (24 hours): Branch check. Did the user complete the first action? If yes, send “next steps” email. If no, send “quick start” reminder with a simpler path.
Day 3 (72 hours): Feature spotlight. But only if the user has logged in at least once. If they have not logged in since signup, send a re-engagement email instead.
Day 7 (1 week): Social proof email. Customer story or use case relevant to the user’s industry (if you captured that during signup). Generic case study if you did not.
Day 14 (2 weeks): Assessment email. For engaged users: feedback request plus premium feature teaser. For disengaged users: “Is this still useful?” with an easy unsubscribe option.
What you need:
- n8n instance (self-hosted or cloud)
- Gmail, SMTP, or SendGrid for sending
- CRM or database with user activity data (HubSpot, Zoho, or even a Google Sheet)
- Webhook from your app to trigger the sequence on signup
The entire workflow uses approximately 15-20 n8n nodes. Not trivial, but manageable in a single workflow.
Step-by-Step: Building the Welcome Sequence in n8n
Start with a Webhook node. Your application fires a POST request to this webhook when a new user signs up. The payload should include: email, name, signup date, and any segmentation data you collected (company size, industry, use case).
Node 1: Webhook trigger. Set HTTP method to POST. Copy the URL into your app’s signup flow.
Node 2: CRM create/update. Use the HubSpot or Zoho CRM node to create a new contact. Tag them as “onboarding-active” and set a custom field for “onboarding_stage: day0”. This gives your sales team visibility into where each user sits.
Node 3: Send welcome email. Use the Gmail node or an SMTP node. Subject line, body, and CTA. Keep it short. One action: “Complete your setup” or “Create your first [thing].”
Node 4: Wait node. Set to 24 hours.
Node 5: HTTP Request to check user activity. Query your app’s API or database to see if the user completed the target action. If your app does not have an API, use a Google Sheets lookup where your app logs events.
Node 6: IF node. Branch based on the activity check. “Completed first action = true” goes one way. “False” goes another.
Each branch follows the same pattern: send email, wait, check activity, branch again. By Day 14, you have 5 emails sent to each user, but the specific emails vary based on their behavior.
Pro tip: Keep all your email content in a Google Sheet or Notion database. Reference it from n8n using a lookup node. This way your marketing team can update copy without touching the workflow.
Conditional Branching: Making It Smart
The real power is in the branch logic. Here are the conditions I typically set up for clients:
Open tracking branch: If a user did not open the previous email, the next email gets a different subject line. This is your built-in A/B test. You are not randomly testing. You are retrying with failed recipients.
Activity-based routing: Pull data from your CRM or product database. Users who completed onboarding milestones skip “getting started” content and receive advanced tips instead. Users who stalled get simplified next steps.
Industry segmentation: If you capture industry during signup, use a Switch node to route users into industry-specific email paths. A real estate agent gets different onboarding content than a SaaS founder.
Engagement scoring: After each email, increment a score in your CRM. Users who open and click get scored higher. By Day 7, you can route high-engagement users to your sales team for a personal outreach, while low-engagement users get automated re-engagement.
In n8n, the Switch node handles up to 10 output branches. For most onboarding sequences, you need 2-4 branches maximum.
One mistake I see constantly: over-branching. Twelve different paths through a 5-email sequence creates an unmaintainable mess. Start with 2-3 branches. Add complexity after you have data showing where the drop-offs happen.
For India-based businesses: watch your send timing. Emails sent between 10 AM and 12 PM IST see the highest open rates for B2B. For B2C, 7-9 PM IST works better. Use the n8n Schedule node to adjust send times based on the user’s timezone if you serve a global audience.
A/B Testing Subject Lines Without Expensive Tools
Most email platforms charge premium prices for A/B testing. With n8n, you build it yourself.
The setup: Before the email send node, add a Function node that randomly assigns users to variant A or B. Store the variant in your CRM alongside the contact.
Here is the logic. Generate a random number between 0 and 1. If it is below 0.5, assign variant A. Otherwise, variant B. Pass the subject line for the assigned variant to the email node.
Tracking results: After 48 hours, query your email provider’s API (Gmail does not support this; use SendGrid or Mailgun for open/click tracking). Pull open rates for each variant. Store results in a Google Sheet.
Auto-winner selection: Add a Function node that compares open rates after your test reaches statistical significance (at least 100 sends per variant). The winning subject line becomes the default for all future sends.
This is not as polished as Mailchimp’s A/B testing UI. But it costs nothing, you control the logic entirely, and you can test things that Mailchimp cannot. Like testing different send times, different “from” names, or different CTA button text.
Realistic benchmarks for onboarding emails: welcome emails should hit 60-70% open rates. Day 1 follow-ups: 40-50%. Day 3: 30-40%. Day 7: 25-35%. Day 14: 20-30%. If your numbers are significantly below these, the problem is usually deliverability, not content.
CRM Integration: Keeping Sales in the Loop
Onboarding emails are not just a marketing function. Your sales team needs to know where each customer sits.
HubSpot integration: Use the HubSpot node in n8n to update contact properties after each email send and each activity check. Set a “last_onboarding_email” property and an “onboarding_engagement_score” property. Create a HubSpot list that filters for high-engagement users on Day 7 or later. Your sales team works this list.
Zoho CRM integration: Same pattern. Use custom fields on the Contact module. Zoho’s Blueprint feature can trigger additional internal actions (like assigning a salesperson) when the engagement score crosses a threshold.
Google Sheets fallback: If you are not using a CRM yet, a Google Sheet works. Columns for: email, name, signup date, onboarding stage, engagement score, last email sent, last email opened. n8n’s Google Sheets node handles all CRUD operations.
In India, Zoho is the pragmatic choice for small businesses. INR pricing, local support, and deep integration with Indian payment gateways. HubSpot’s free tier works but gets expensive fast once you need marketing automation features beyond the basics.
The CRM update should happen at every stage of the onboarding flow. Not just at the end. If a user drops off at Day 3, your sales team should know that and reach out within 24 hours. Automated emails for the masses, personal touch for high-value leads.
Common Mistakes and How to Avoid Them
Mistake 1: Sending too many emails too fast. Five emails in 14 days is the upper limit. More than that and you are training users to ignore you. For B2B SaaS, 4 emails in 14 days is safer.
Mistake 2: No suppression for converted users. If a user completes their purchase or achieves the activation goal, stop the onboarding sequence immediately. Nothing kills trust faster than a “Getting started” email to someone who has been using your product for a week. In n8n, add an activity check before every email send.
Mistake 3: Ignoring deliverability. Gmail’s sending limits are 500 emails per day for regular accounts, 2,000 for Google Workspace. If you are onboarding more than 50 users per day, use a dedicated sending service. SendGrid’s free tier gives you 100 emails per day. Mailgun’s flex pricing charges per email with no monthly minimum.
Mistake 4: Not warming up your sending domain. New domains or email addresses need 2-4 weeks of gradual volume increase before sending at scale. Start with 50 emails per day and increase by 25% daily. Skip this step and your emails go straight to spam.
Mistake 5: Generic “from” names. “noreply@company.com” gets lower open rates than a real person’s name. Use “Krishna from triggerAll” not “triggerAll Team.” People open emails from people, not brands.
India-specific consideration: If your audience is primarily mobile (and in India, it is), keep emails under 300 words. Long emails look terrible on small screens and get abandoned. One CTA per email. Big, tappable buttons. No tiny text links.
FAQ
How long does it take to build this onboarding workflow in n8n? Expect 4-6 hours for a basic 5-email sequence with 2-3 conditional branches. Add another 2-3 hours for CRM integration and A/B testing. The initial build takes the longest. Iterating on email content after that is quick.
Can I use Gmail for sending onboarding emails? For small volumes (under 50 signups per day), yes. Gmail’s daily sending limit is 500 for personal accounts, 2,000 for Google Workspace. Beyond that, use SendGrid, Mailgun, or Amazon SES. SES is the cheapest at $0.10 per 1,000 emails.
What open rates should I expect? Welcome emails: 60-70%. Subsequent onboarding emails: 25-50% depending on relevance and timing. If your welcome email is below 50%, check your subject line and sender reputation first.
How do I handle users in different timezones? Store the user’s timezone during signup. In n8n, use a Function node to calculate the optimal send time for each user. Add a Wait node set to the calculated delay. This adds complexity but significantly improves engagement for global audiences.
Should I include unsubscribe links in onboarding emails? Yes. Legally required in most countries (CAN-SPAM, GDPR, India’s upcoming DPDP rules). Practically, it is better to let disengaged users opt out than to have them mark you as spam. Spam reports hurt your sender reputation far more than unsubscribes.
Can this work with WooCommerce instead of a SaaS product? Absolutely. WooCommerce fires webhooks on order creation. The onboarding sequence becomes a post-purchase sequence: order confirmation, shipping update, product tips, review request, cross-sell. Same n8n architecture, different email content.
What if I do not have a CRM yet? Start with Google Sheets. Create a sheet with columns for user data, onboarding stage, and engagement tracking. n8n’s Google Sheets integration handles reads and writes. Migrate to a proper CRM once you cross 500 active contacts. Before that, a CRM adds complexity without enough value.
Building onboarding email automation is one of the highest-ROI workflows you can set up. The math is straightforward: better onboarding reduces churn, higher engagement increases lifetime value, and conditional logic ensures you are not wasting sends on people who already converted.
If you need help building an onboarding automation system for your business, triggerAll builds these. We handle the n8n setup, CRM integration, email templates, and ongoing optimization.
Need help implementing this?
Book a free 30-minute discovery call. We'll map your current setup, identify quick wins, and outline what automation can do for your business.
Book a Free Discovery Call