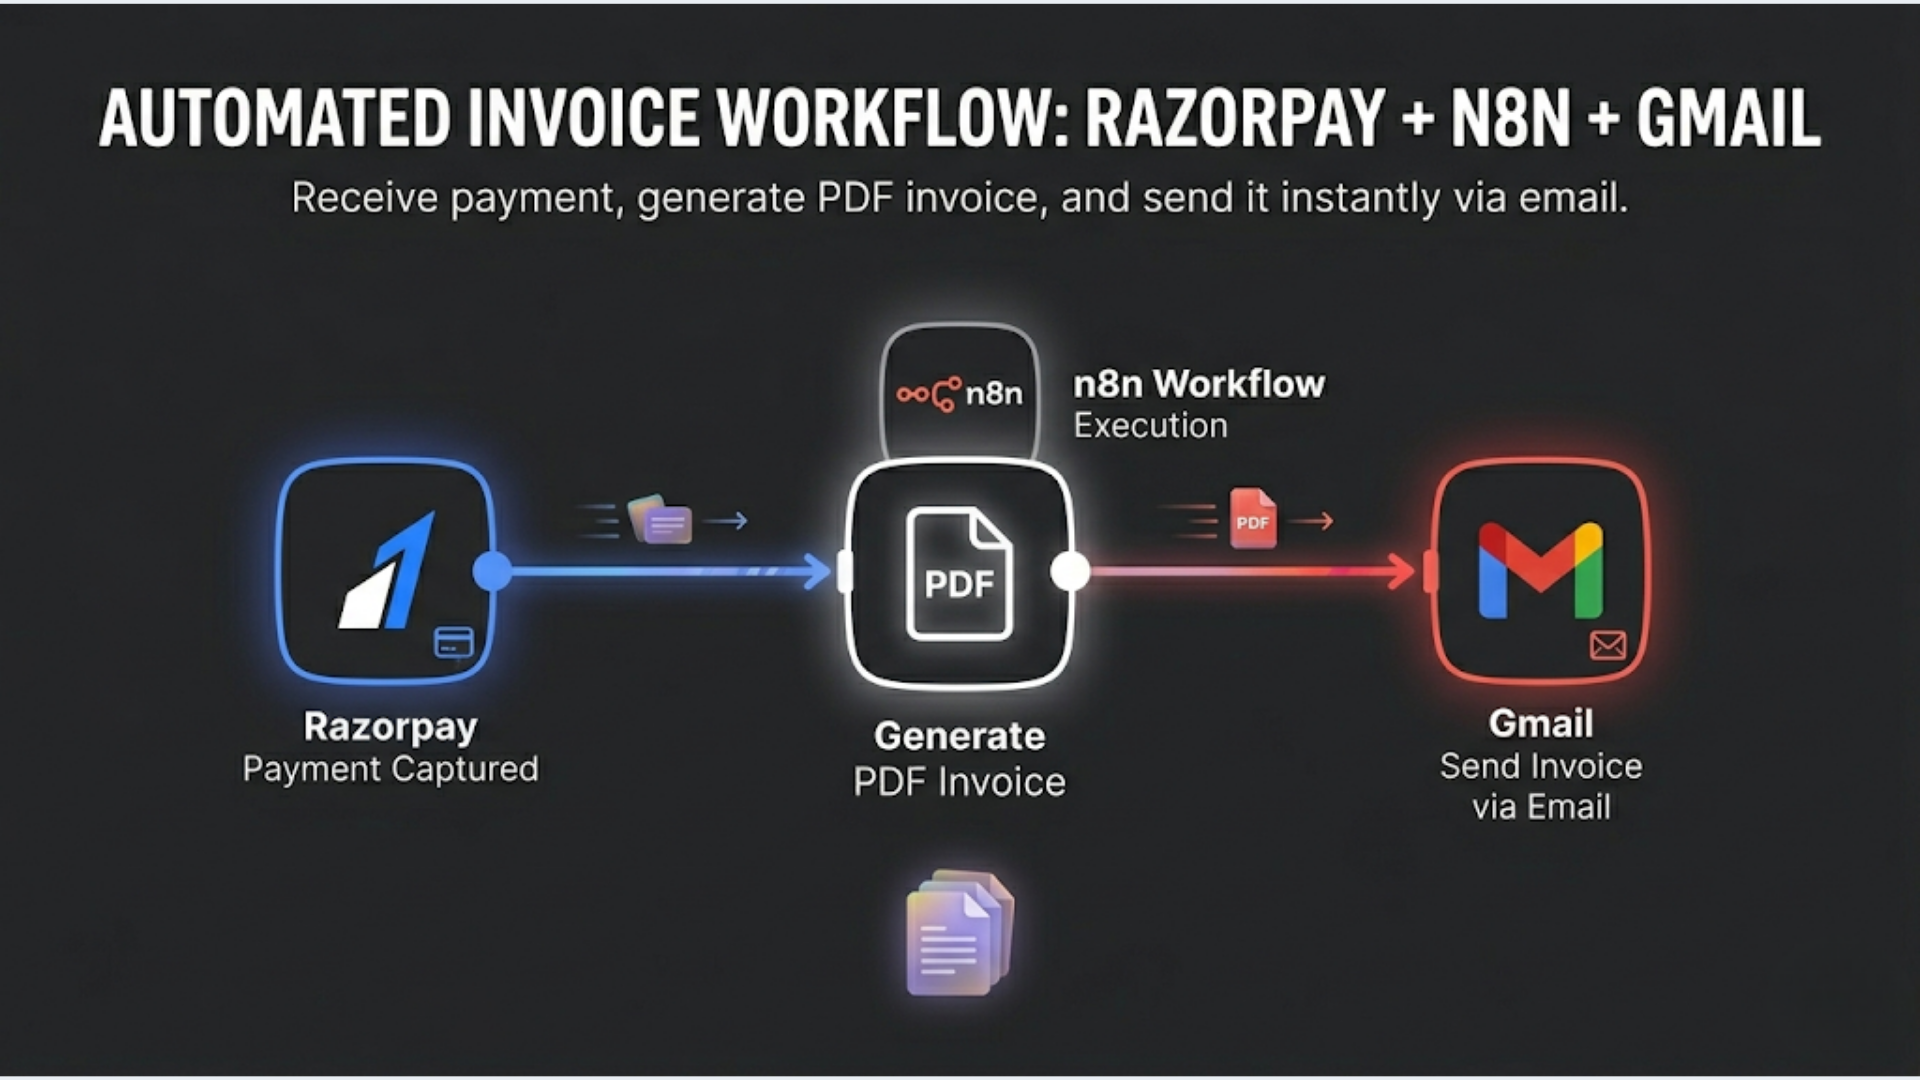
How to Auto-Send Invoices from Razorpay to Gmail with n8n
Step-by-step tutorial to automatically generate and email invoices when a Razorpay payment is captured. n8n workflow with PDF generation, GST compliance, and error handling.
How to Auto-Send Invoices from Razorpay to Gmail with n8n
This tutorial builds an n8n workflow that automatically generates a GST-compliant invoice PDF and emails it to the customer within 60 seconds of a Razorpay payment being captured. Total setup time: 30-45 minutes. No code required beyond a simple HTML invoice template.
Businesses generating 100-500 invoices per month by hand are wasting 15-20 hours on work a 6-node n8n workflow handles in the background without anyone thinking about it.
Here’s the complete build.
What You Need Before Starting
Accounts required:
- Razorpay account (any plan, Test mode works for building)
- Gmail account (or Google Workspace)
- n8n Cloud ($20/mo) or self-hosted n8n (free)
You’ll also need:
- Your business GSTIN (if you’re GST-registered)
- Your bank details for the invoice
- A logo file URL (hosted anywhere accessible via URL)
- Your HSN/SAC code for the service or product you sell
What you’ll build:
A workflow that listens for Razorpay payment events, extracts customer and payment details, generates an invoice with a unique sequential number, converts it to PDF, and emails it to the customer. All automatic. The customer pays, they get an invoice in their inbox within a minute.
Step 1: Configure the Razorpay Webhook
Razorpay sends real-time notifications about payment events via webhooks. We need to tell Razorpay to notify our n8n workflow whenever a payment is successfully captured.
In n8n:
- Create a new workflow
- Add a “Webhook” trigger node
- Set HTTP Method to POST
- Set Path to something descriptive like
/razorpay-invoice - Under Authentication, select “Header Auth”
- Set the header name to
x-razorpay-signature(we’ll validate this later) - Copy the full webhook URL (e.g.,
https://your-instance.n8n.cloud/webhook/razorpay-invoice)
In Razorpay Dashboard:
- Go to Settings > Webhooks
- Click “Add New Webhook”
- Paste the n8n webhook URL
- Set a webhook secret (save this, you’ll need it for signature verification)
- Under Active Events, select only
payment.captured - Click “Create Webhook”
Why payment.captured and not payment.authorized?
payment.authorized means the bank approved the charge but money hasn’t moved yet. payment.captured means money is actually collected. You want to send invoices for captured payments, not authorized-but-potentially-refunded ones. For most Razorpay integrations with auto-capture enabled, these events fire within seconds of each other. But if you use manual capture (common for some e-commerce flows), the gap can be hours or days.
Test the webhook:
In Razorpay, click “Test Webhook” on your newly created webhook. Razorpay sends a sample payment.captured event to your n8n endpoint. In n8n, you should see the data arrive in the Webhook node. The payload includes: payment.entity.id, payment.entity.amount (in paise), payment.entity.currency, payment.entity.email, payment.entity.contact, and payment.entity.notes (where you can store additional customer data).
Step 2: Extract and Transform Payment Data
The raw Razorpay webhook data needs to be cleaned up before you can use it in an invoice. Amounts are in paise (not rupees), customer details might be in notes, and you need to generate a sequential invoice number.
Add a “Code” node in n8n:
This node transforms the raw data into invoice-ready fields.
const payment = $input.first().json.payload.payment.entity;

// Convert paise to rupees
const amountRupees = payment.amount / 100;

// Calculate GST (assuming 18% inclusive)
const baseAmount = Math.round((amountRupees / 1.18) * 100) / 100;
const gstAmount = Math.round((amountRupees - baseAmount) * 100) / 100;
const cgst = Math.round((gstAmount / 2) * 100) / 100;
const sgst = Math.round((gstAmount / 2) * 100) / 100;

// Generate invoice number (YYYYMM-sequential)
const now = new Date();
const prefix = `INV-${now.getFullYear()}${String(now.getMonth() + 1).padStart(2, '0')}`;

return [{
  json: {
    invoicePrefix: prefix,
    paymentId: payment.id,
    customerEmail: payment.email,
    customerPhone: payment.contact,
    customerName: payment.notes?.customer_name || payment.email.split('@')[0],
    customerGstin: payment.notes?.gstin || '',
    description: payment.description || payment.notes?.description || 'Professional Services',
    amountTotal: amountRupees.toFixed(2),
    amountBase: baseAmount.toFixed(2),
    cgst: cgst.toFixed(2),
    sgst: sgst.toFixed(2),
    gstTotal: gstAmount.toFixed(2),
    currency: payment.currency,
    paymentMethod: payment.method,
    paidAt: new Date(payment.created_at * 1000).toLocaleDateString('en-IN'),
    invoiceDate: now.toLocaleDateString('en-IN'),
  }
}];
Important: This example assumes 18% GST inclusive in the payment amount. If your pricing is GST-exclusive (customer pays base + GST on top), adjust the calculation accordingly. If you sell different products with different GST rates (5%, 12%, 18%, 28%), you’ll need to pass the GST rate in Razorpay’s notes field during payment creation and use it dynamically.
Invoice number sequencing:
The code above generates a prefix like INV-202604. For the sequential part, you have two options:
-
Simple: Use a Google Sheet as a counter. Before generating the invoice, read the last row from a “Invoice Numbers” sheet, increment by 1, and write the new number back. Invoice number becomes
INV-202604-0042. -
Robust: Use a database (PostgreSQL, MySQL, or even Airtable) with an auto-increment field. This prevents race conditions if two payments come in simultaneously.
For businesses generating fewer than 50 invoices/month, the Google Sheet approach is fine. For higher volume, use a database.
Add a Google Sheets node after the Code node:
- Connect to your Google account
- Select your “Invoice Tracker” spreadsheet
- Operation: “Append Row”
- Map: Invoice Number, Date, Customer Name, Email, Amount, GST, Payment ID
- After appending, read the row number and use it as the sequential invoice number
Step 3: Generate the Invoice PDF
This is the step most tutorials skip or overcomplicate. You don’t need a PDF library. You don’t need a third-party invoice service. You need an HTML template converted to PDF.
Option A: HTML-to-PDF via API (recommended)
Use a free HTML-to-PDF API like PDFShift, DocRaptor, or the open-source Gotenberg (self-hostable). Feed it an HTML invoice template with your data injected, get a PDF back.
Add an HTTP Request node in n8n:
If using Gotenberg (self-hosted, free):
- Method: POST
- URL:
http://your-gotenberg-instance:3000/forms/chromium/convert/html - Body type: Form Data
- Add a field: name =
files, type = File, filename =invoice.html - The file content is your HTML invoice template with variables replaced
The HTML invoice template:
Build a clean HTML template with your branding. Here’s the structure:
<!DOCTYPE html>
<html>
<head>
  <style>
    body { font-family: Arial, sans-serif; margin: 40px; color: #333; }
    .header { display: flex; justify-content: space-between; margin-bottom: 30px; }
    .company-name { font-size: 24px; font-weight: bold; }
    .invoice-title { font-size: 20px; color: #666; }
    table { width: 100%; border-collapse: collapse; margin: 20px 0; }
    th, td { padding: 10px; text-align: left; border-bottom: 1px solid #ddd; }
    th { background: #f5f5f5; }
    .total-row { font-weight: bold; font-size: 16px; }
    .footer { margin-top: 40px; font-size: 12px; color: #999; }
  </style>
</head>
<body>
  <div class="header">
    <div>
      <div class="company-name">Your Company Name</div>
      <div>GSTIN: YOUR_GSTIN</div>
      <div>Your Address</div>
    </div>
    <div>
      <div class="invoice-title">TAX INVOICE</div>
      <div>Invoice #: {{invoiceNumber}}</div>
      <div>Date: {{invoiceDate}}</div>
      <div>Payment ID: {{paymentId}}</div>
    </div>
  </div>

  <div>
    <strong>Bill To:</strong><br>
    {{customerName}}<br>
    {{customerEmail}}<br>
    {{customerGstin ? 'GSTIN: ' + customerGstin : ''}}
  </div>

  <table>
    <tr><th>Description</th><th>HSN/SAC</th><th>Amount</th></tr>
    <tr><td>{{description}}</td><td>YOUR_SAC_CODE</td><td>Rs. {{amountBase}}</td></tr>
    <tr><td>CGST (9%)</td><td></td><td>Rs. {{cgst}}</td></tr>
    <tr><td>SGST (9%)</td><td></td><td>Rs. {{sgst}}</td></tr>
    <tr class="total-row"><td>Total</td><td></td><td>Rs. {{amountTotal}}</td></tr>
  </table>

  <div><strong>Payment Status:</strong> PAID via {{paymentMethod}}</div>

  <div class="footer">
    This is a computer-generated invoice and does not require a signature.
  </div>
</body>
</html>
Replace the placeholders with your actual business details. The variable tags ({{invoiceNumber}}, etc.) are replaced by n8n’s expression engine before sending to the PDF converter.
Option B: Use a Google Doc template
If you prefer not to deal with HTML, create a Google Doc invoice template with placeholder text like {customerName}, {amountTotal}, etc. Use n8n’s Google Docs node to create a copy of the template, replace the placeholders with actual data, and export as PDF. This approach is slower (2-3 seconds per invoice vs 0.5 seconds for HTML-to-PDF) but easier to maintain if non-technical team members need to update the invoice design.
Step 4: Email the Invoice via Gmail
The last node sends the invoice PDF to the customer.
Add a Gmail node in n8n:
- Connect your Gmail account (or Google Workspace account)
- Operation: Send Email
- To:
{{$node["Code"].json.customerEmail}} - Subject:
Invoice {{invoiceNumber}} from Your Company - Payment Confirmed - Body (HTML):
Hi {{customerName}},

Thank you for your payment of Rs. {{amountTotal}}.

Please find your invoice (#{{invoiceNumber}}) attached to this email.

Payment details:
- Amount: Rs. {{amountTotal}} (incl. GST)
- Payment ID: {{paymentId}}
- Date: {{invoiceDate}}
- Method: {{paymentMethod}}

If you have any questions about this invoice, reply to this email.

Best regards,
Your Name
Your Company- Attachments: Binary data from the PDF generation step
- Attachment filename:
Invoice-{{invoiceNumber}}.pdf
Sending from a professional email:
If you’re on Google Workspace, send from your business email (e.g., billing@yourcompany.com). If you’re on personal Gmail, the invoice comes from your personal address. For professional appearance, Google Workspace is worth the $6/month.
BCC yourself:
Add your own email as BCC on every invoice email. This creates a searchable archive in your Gmail without cluttering the customer’s CC line.
Step 5: Error Handling and Edge Cases
The basic workflow above handles the happy path. Here’s what can go wrong and how to handle it.
Duplicate webhooks:
Razorpay sometimes sends the same webhook event twice (retry on timeout). Your workflow should check if an invoice has already been generated for this payment ID. Add a lookup step: query your Google Sheet (or database) for the payment ID. If it exists, skip the invoice generation. If it doesn’t, proceed.
Payment amount is zero:
Test transactions, refund-and-repay scenarios, or promotional 100%-off codes can result in zero-amount payments. Add an IF node after the webhook: if amount equals 0, skip invoice generation. No point invoicing for ₹0.
Missing customer email:
Some Razorpay payments (especially via payment links) might have incomplete customer data. Add a check: if email is missing, log the payment to a “manual review” sheet and send yourself a Slack or email notification. Don’t let the workflow fail silently.
Gmail sending limits:
Gmail limits sending to 500 emails/day (personal) or 2,000/day (Workspace). If you process more payments than this, switch to SendGrid or Amazon SES for email delivery. Same n8n workflow, different email node.
Webhook signature verification:
For production use, verify the Razorpay webhook signature to ensure the request actually came from Razorpay and wasn’t spoofed. Add a Code node at the start of the workflow:
const crypto = require('crypto');
const webhookSecret = 'your_razorpay_webhook_secret';
const signature = $input.first().json.headers['x-razorpay-signature'];
const body = JSON.stringify($input.first().json.body);

const expectedSignature = crypto
  .createHmac('sha256', webhookSecret)
  .update(body)
  .digest('hex');

if (signature !== expectedSignature) {
  throw new Error('Invalid webhook signature');
}

return $input.all();
This prevents anyone from hitting your webhook URL with fake payment data and triggering invoice generation.
The Complete Workflow: Node by Node
Here’s the final workflow structure:
[Razorpay Webhook]
    -> [Signature Verification (Code)]
    -> [Duplicate Check (Google Sheets Lookup)]
    -> [IF: Not Duplicate]
        -> [Transform Data (Code)]
        -> [Append to Invoice Sheet (Google Sheets)]
        -> [Generate PDF (HTTP Request to Gotenberg)]
        -> [Send Email (Gmail)]
        -> [Success Notification (Slack, optional)]
    -> [IF: Duplicate]
        -> [Skip (No Op)]
Total nodes: 7-9 depending on whether you include signature verification and Slack notifications.
Execution time: 2-5 seconds from payment capture to email delivered.
Monthly cost: n8n Cloud ($20-50) + Gotenberg hosting ($5-10 if self-hosted, or $0 if you use a free-tier PDF API) + Gmail ($0-6). Total: $20-66/month for unlimited invoices.
GST Compliance: What Your Invoice Must Include
If you’re GST-registered in India, your automated invoices must include specific fields to be legally valid. Missing any of these means the invoice isn’t compliant and your customer can’t claim input tax credit.
Mandatory fields for a GST tax invoice:
- Your business name and address
- Your GSTIN
- Consecutive invoice number (unique, sequential, within a financial year)
- Invoice date
- Customer name and address
- Customer GSTIN (if B2B and they’re GST-registered)
- HSN code (for goods) or SAC code (for services)
- Description of goods/services
- Quantity and unit (for goods)
- Taxable value (before GST)
- GST rate and amount (CGST + SGST for intra-state, or IGST for inter-state)
- Total invoice value
- Place of supply (state)
Intra-state vs inter-state:
If your business and customer are in the same state, you charge CGST + SGST (e.g., 9% + 9% = 18%). If in different states, you charge IGST (e.g., 18%). Your automation needs to determine this based on the customer’s state. If you collect the customer’s state during payment (via Razorpay notes or a pre-payment form), the Code node can calculate the correct tax split.
For businesses selling only within one state (common for local service providers), hardcode CGST + SGST. For businesses with customers across India, add the state-based logic.
Invoice number sequence:
GST requires consecutive invoice numbers. No gaps. If invoice #42 exists, the next must be #43. The Google Sheet counter approach handles this if you use a single sheet per financial year and never delete rows. For absolute reliability, use a database with a serial/auto-increment column.
FAQ
How do I automatically send invoices from Razorpay?
Set up a Razorpay webhook for the payment.captured event, pointing to an n8n workflow. The workflow extracts payment details, generates an invoice PDF from an HTML template, and emails it to the customer via Gmail. Total setup time: 30-45 minutes. Each invoice sends within 60 seconds of payment.
Does Razorpay generate invoices automatically? Razorpay has a built-in invoice feature, but it’s limited. It doesn’t support custom branding, doesn’t calculate GST breakdowns automatically for all scenarios, and doesn’t integrate with your accounting system. For most businesses, a custom n8n workflow produces better invoices with full GST compliance and automatic bookkeeping integration.
How do I generate GST-compliant invoices automatically? Build an HTML invoice template that includes all 13 mandatory GST fields (GSTIN, HSN/SAC code, tax breakdown, place of supply, etc.). Use n8n to inject payment data into the template and convert to PDF. The critical logic is determining intra-state vs inter-state supply to calculate CGST+SGST or IGST correctly. This requires knowing the customer’s state at payment time.
What is the best PDF generation tool for n8n? Gotenberg (self-hosted, free) converts HTML to PDF and integrates easily with n8n via HTTP Request. PDFShift and DocRaptor are cloud alternatives if you don’t want to self-host. For simpler needs, using a Google Docs template with n8n’s Google Docs node works but is slower (2-3 seconds vs 0.5 seconds per invoice).
How do I handle duplicate Razorpay webhooks in n8n? Before generating an invoice, check if the payment ID already exists in your invoice tracker (Google Sheet or database). If it does, skip the workflow. Razorpay retries webhooks on timeout, so duplicates are common. Without this check, you’ll send duplicate invoices to customers.
Can I use this workflow for Razorpay payment links?
Yes. Payment links trigger the same payment.captured webhook event when someone pays. The workflow works identically. The only difference: payment link payments might have less customer data in the payload (no notes field). Make sure your workflow handles missing fields gracefully by using fallback values.
Need help implementing this?
Book a free 30-minute discovery call. We'll map your current setup, identify quick wins, and outline what automation can do for your business.
Book a Free Discovery Call